
1944 Willys MB
| history | tub prep work | tub accessories | removing the tub | prep frame | building the tub | install new tub | jeep's birthday | IN ACTION | vendors | Thanks!
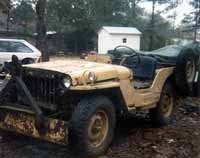
Jeep as purchased by Richard Grace in 1993
| As you can see from the photos, it was in pretty rough shape. Civilian bumper, hole cut in hood for air cleaner, extensive rust to body, spare tire moved to driver's side, no windshield. Pretty much a basket case at first glance. |
|
|
 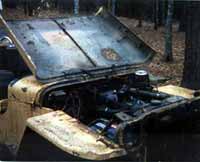  |
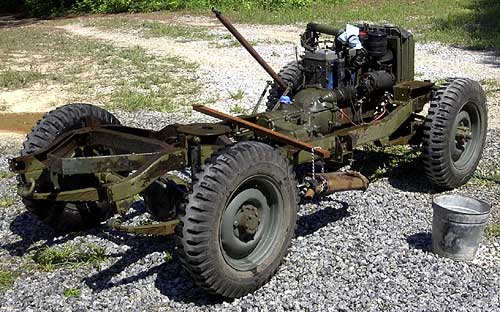
April 28, 1999 - I purchased the jeep from Richard Grace
There had been a lot of work done, and a couple of owners since Richard Grace first acquired this jeep.
 |
This is the jeep as I purchased it. In USMC livery. Mismatched paint due to the various owner's work. (2 owners ago was restoring it as Army, last owner as USMC) All USMC jeeps had USMC dataplates...mine now has standard Army plates...that was reason enough, I'm restoring it as ARMY!!!! *note: Don't worry, I'm keeping all USMC accessories & the original tub in case I ever need them, although it's fairly well gone as far as originality goes...thus my nickname for it "jeepsoup". |
|
|
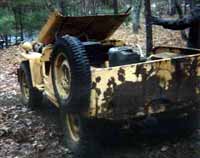
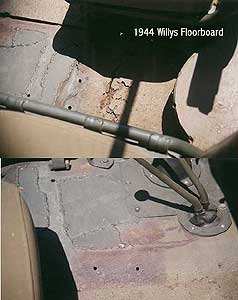
The original tub had extensive rust, patches, and replacement sections. In the photos on the left, you can see where the floor has rusted thru to the wood in the hat channel. Also some of the patches to fill the holes from the generator used to run the radios. The back floor was all replacement steel, which has rusted horribly and had severe pitting. The back panel (tailgate area) was a repro panel, and the sides had been replaced with sheetmetal from donor jeeps. Due to the severity of the modifications and the cost to get this tub back to original, I decided to go with a repro tub I got from Richard Grace. |
 |
thru October 21, 2001 - Repro tub paint & prep work
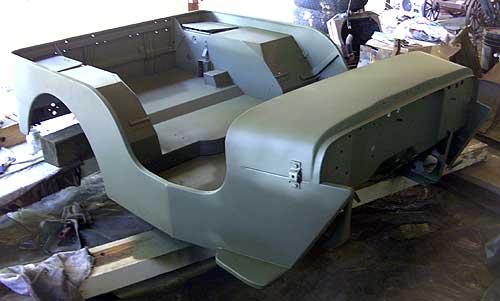 |
Here's the repro tub after being painted. I sanded the entire tub using a D/A Sander, then applied a coat of POR-15 to the underside of the tub in hopes of fending off rust in the future. On top of the POR-15 was a coat of Tie-Coat Primer (for bonding POR-15 to convention paint) then Red-Oxide Primer and OD 319 paint. |
thru April 21, 2002 - Building the tub
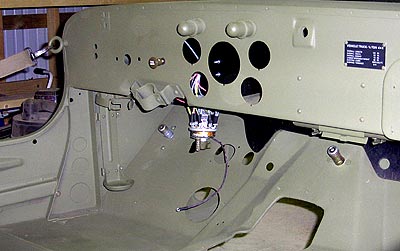 |
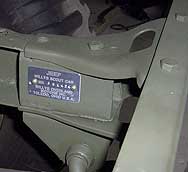
Here's a shot of the dash. The four screws on the dash, below the dataplate, are for the first aid kit bracket. You can see the kit in the bracket just below the dashboard. The floor starter switch and high/low beam switch are installed. On the left wall is the fire extinguisher bracket. The mass of wires hanging down is the light switch. All parts that I've transferred from the parts jeeps & project jeep are sandblasted, primed, and painted. |
 |
From the side you can see the side & corner handles installed, the door strap attached to the ring on the dash, and all the attachment hardware for the ax and shovel are installed. You can also see the main wiring harness installed & attached to the firewall. I used graph paper along with the drawings from jeepdraw to locate all the holes.
|
 |
This photo of the back shows the gas can bracket, spare tire mount, corner handle, trailer plug (below corner handle) and footman loops for securing the top. At this point, I've counted about 90 holes I've had to drill in the reproduction tub. By the time it's on the jeep, there will probably be well over 120-130 holes in the tub! *
*when installing a repro tub, buy a good drill & quality drill bits. =^) |
thru May 5, 2002 - More little stuff
 |
Blasted/painted the rear view mirror (not the glass! =^) ), attachment "thingies" for the canvas half-doors, painted the reflector housings, and attached more small bits & pieces to the tub. A few things I notice for people to watch for: |
 |
2. Install the rear-view mirror mounting
brackets before you install the fire extinguisher bracket...otherwise you
have to contort to attach the mirror...like I had to! |
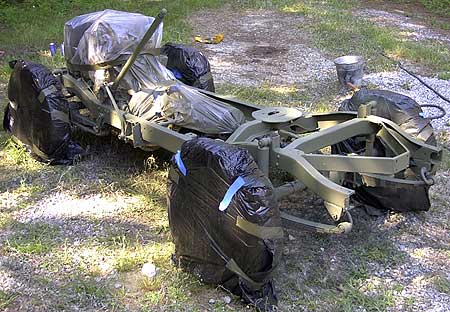
May 17-19, 2002 - Removing the Tub
|
|
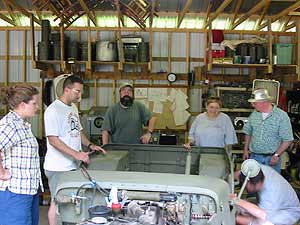
The time has come! Friday evening & Saturday I got the jeep &
shop ready for the Tub removal. Photographed all connections, disconnected
all body bolts, etc. On Sunday morning, my Dad came over & we disconnected
all the wires, cables, etc going from the tub to the engine, etc. When I removed the sheet steel patches on the floor, I got a good idea of how bad the old tub was. You can see the hole under where the gas tank was. (under the driver's seat) The wood support in the floor was so rotten, you could break up the wood using a screwdriver. |
|
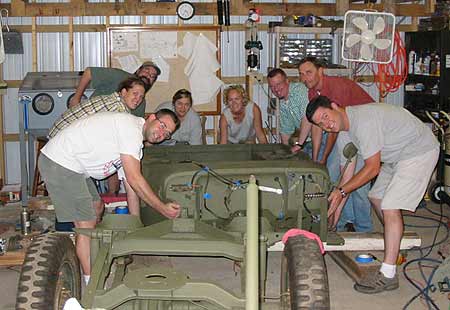
Here's a photo of everyone who helped with removing the tub. From left to right Kevin Lynch, Robin Mead (my wife), Stephanie McKinnell, Stuart Mead (my dad), Frank Edwards, John McKinnell, and me sitting on the jeep! Thanks to everyone's help, we got the tub off quickly & without incident! |
|

|
|
Here's the shop. The old tub is in front, the new tub is in back, and the frame/engine/etc is is on the right. The corkboard on the left wall is covered with wiring schematics, connector drawings etc. The shelf to the right is just for jeep parts, nuts/bolts, accessories, etc. *Note: when you're buying your air compressor, buy one twice as big as you think you'll need, and way over your budget! ...then it'll be barely sufficient! |

|
No photos here! Kinda boring day for a photo. I spend the day scraping
60 years of gunk off the frame! I took off the bumperettes, bumper,
and rear crossmember. At 6:30 my dad came by & helped me take parts
off the old tub and disassemble sub-assemblies for painting. We got
the Throttle cable, Choke cable, and a couple of bond straps put on
the new tub too. The most exciting part of the day was when the stereo receiver "popped" and started smoking! I quickly disconnected it, plugged the CD-Player into the boom box, and kept on rockin! May 21 - 23 were spent priming & painting the frame. I also painted the hood, fenders, bumperettes, bumper, crossmember, black out light, and various nuts & bolts.
|
|
|
Here's the dash. Everything is there except for the dataplates on the glovebox. Richard Grace loaned me a set of GI Issue metal stamps, so I've got to stamp the repro plates. He told me the trick, so y'all have to wait for me to show you how that goes! =^) Everything went into the dash fine. The order of installation was: 1) panel lights & most of the rotary light switch 2) throttle & choke cables 3) emergency brake handle 4) amp gauge & fuel gauge 5) all the wiring 6) speedo, oil pressure, & temp gauge. By doing it in this order, I worked from the top down. By filling down, I didn't have to work around anything already in the dash. |
|
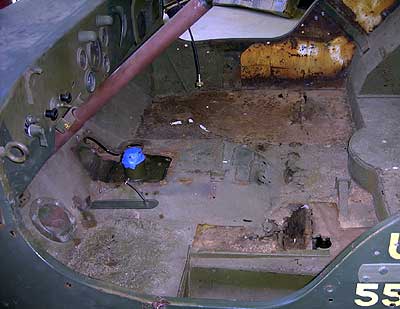
Here's the firewall on the old tub... Notice the USMC green exterior, Army green top firewall, USMC green lower firewall, and some of the "Bubba" applied yellow paint on the front edge of the tub. You can't see it in this photo, but the USMC undercoated the tub & frame...probably the main reason the frame was in as good a shape as it was.
|
 |
...and the new tub's firewall. Basically everything is installed that goes on the tub. *Note: Leave the grommets out of the holes until you run the wiring, otherwise you'll have to pull the grommets out to run the wiring then put them back. =^) My dad had to "waller" out the mounting holes on the fuel filter since the repro tub's captured nuts were closer together than the original tub's. Also, The thread pattern on the repro tub captured nuts is different from the original tub, so I had to use new bolts for attaching the air cleaner brackets, horn bracket, and fuel filter bracket. |
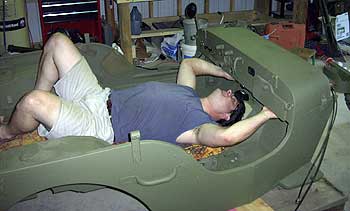 |
Photo of me working on the dash. Richard Grace recommends standing the tub on it's end & working in the dash standing up. Since I'm 6'3" tall, that wouldn't work for me. I took one of the cushions out of our 1972 Travel Trailer (lovely fabric, isn't it? =^) & it made a fine pad for me to work on! |
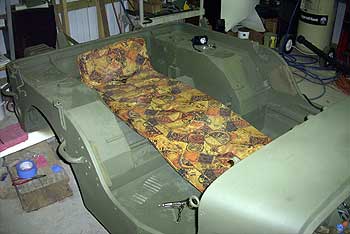 |
Here's a shot of the pad. I'd also recommend a flashlight that straps to your head and safety goggles. Both came in handy for working under the dash of the jeep. I had hoped to put the tub on the frame today, but wasn't able to get enough people together to do it. If I can, I'll dig up an engine hoist so I can put the tub on by myself...otherwise it's 2 weeks until a free weekend...and I'll have to beg the friends to come help. (please?!?) |


June 16, 2002 - Install the new
tub
|
|
|
|
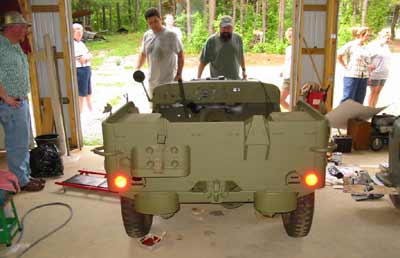
Here's the first attempt at putting the tub on. We got it most of the way down, just to find out there was too much of a lip on the tub so the machine gun mount wouldn't clear. (You can see the machine gun mount in the photo above, it's the round metal plate with the hole in the center. So we had to take it back off & do a little "modification". |
|
 |
Here I am doing a minor tub adjustment. =^) When cutting off the extra metal, just make sure you don't cut off the spot welds holding the floor to the vertical wall. I just traced the machine gun mount edge while the tub was almost on, then cut along the line. A quick spray of OD and it was ready to try again. |
|
|
Now that the tub is back on, I can see a couple issues with the tub/frame
fit that I'll have to deal with: |
|
|
|

June 22-23, 29-30, 2002 - Fenders, Grill, Body Bolts, Reconnect
small stuff
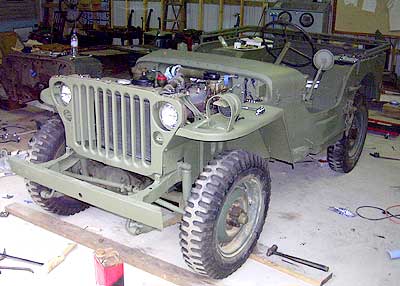
It really doesn't look much
different than the last photos, except for the addition of the grill & fenders.
I spent much of the weekend of 22-23 battling with the tub & fenders.
I thought it would be a quick & easy install...HAH! Fooled me. I finally
got it all aligned & got the fenders attached. Whew! (The final trick
was to use a floor jack to lift the tub enought to align the bolts. Then
I could shim the tub with the rubber bushings.) |
 |
|
|
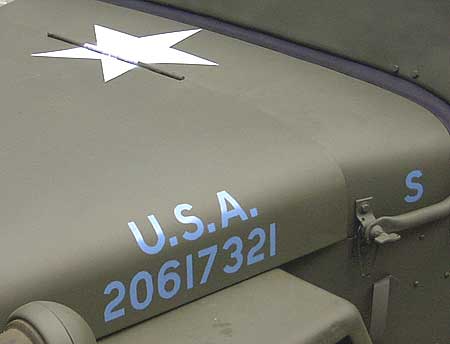
I've also been debating the hood number. Since this was originally a USMC jeep, it never was assigned a hood number. Not to mention even if it had been an Army jeep, it doesn't have it's original hood. So, I just made an educated guess off the serial number & DOD on the dataplate. I finally decided on 20617321. Jon Rogers of JeepDraw was kind enough to send me a corel draw file of the hood numbers. Now I just have to print it out & cut the stencil. For the unit lettering & stars, I'm going to use the info in the book "All American Wonder". Check out the MVPA supply room to see some of the books & repro manuals available for the WW2 jeep. Since the jeep couldn't have made it to Europe less than 3-4 months after D-Day, I'm going to go with the regulation stars, not the D-Day invasion stars(star with circle around it). |
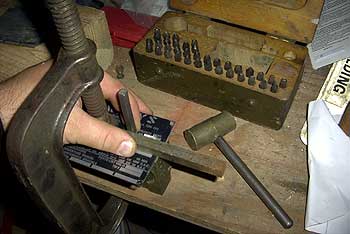
Stamping the Repro Dataplates |
|
|
|
|
|

|
Saturday July 27th, 2002 my jeep was 58 years old! Not near as good as the day she was delivered, but MUCH better than she's probably been in the last 50 years! I had hoped to get her running for her birthday, but to no avail. The starter gave out as I tried to get her running. Other things to do: bolt the transmission access covers on the floor, troubleshoot some of the lighting, make a wood filler for the bumper, attach the front muffler bolt, and wash & paint the rims. For the stencils, I thought I'd go the cheap route. I bought 2 20"x30" sheets of stencil oil board from Dick Blick Art Supply. With this, a straight edge & an exacto blade, I set about making my stencils.
I held the stencils on the jeep using cheap magnets
from Hobby Lobby. They have a pack of 50 magnets for under $10.00
You'll have to break some of the magnets into pieces so you'll have
smaller magnets for the areas in the inside of letters/numbers. I
placed the magnets around the edge of the cutouts in the stencil.
Then I used wax paper & blue 3M masking tape to mask off the areas
around the oil board. The white paint came out of a spray can, but
I used a cheap Testor's brand model airbrush to paint the blue hood
numbers. You can get this airbrush at Wal-Mart for less than $20.00
and it works great. I didn't even have to thin the paint to spray
it. It gives a spray diameter of about 1", so it covered the
stencils perfectly without too much waste or overspray. |

In Action - photos of the jeep since restoration
 |
Boonsboro, Md - Oct. 18-20, 2002 This was the first event for the jeep. We used the jeep to support the field kitchen. I can't count how many trips we made in the jeep for firewood and water. As you can see, we broke it in quickly! Now to get the trailer ready so we can haul the wood/water/etc in the trailer instead. |
|
Here's another picture from the Boonsboro, Md tactical. The jeep is being used as a dinner table by two of the GIs in the 29th Infantry Division Living History Association. |
 |
|
Here's the jeep in front of the kitchen tent. Among the various WW2 era kitchen stuff, we've got two M1937 field ranges and two M1944 20-man cook stoves. Roll over the picture to see a b/w version of the photo. |
|
|
Here's the jeep & all the kitchen stuff ready to head home. |
 |

Richard Grace - project jeep, repro tub, paint, NOS electrical parts, wiring harness, various small parts 770-463-3672
Griffin Hardware Co. - just about all the screws, nuts & bolts for the project. 770-227-9494
Brent Mullens Jeep Parts - various small parts
Rapco - spray cans of paint, dataplates, various small parts 940-872-2403
Portrayal Press - manuals
Beachwood Canvas Works - windshield cover, tool bad, misc. straps
Army Jeep Parts - various small parts
Peter DeBella Jeep Parts - various small parts 613-874-8660
JeepDraw - Jon Roger's amazing site filled with drawings of jeep parts so you can make your own reproductions.
MVPA - Supply Room - MVPA jeep manual & book store.
Thanks!
I'd like to thank everyone who's helped so far on this project:
- Robin Mead - my wife. Thanks for everything. Patience, inspiration, & support.
- Stuart Mead - my dad. Thanks to you & mom for raising me right, helping me build the jeep, and the support only a dad can give. ...and as you know, this is all your fault! =^) I trace my obsession back to the M-38 in the sandbox of the playground on Ft. McClellan! Thanks!
- Richard Grace - you're a wealth of knowledge & a great parts source!
- Bart Smith - the greatest neighbor a guy could have! Thanks for helping move the repro tub from garage to barn & back for painting!
- The tub lifting crew: Stephanie McKinnell, John McKinnell, Frank Edwards, Kevin Lynch, Robin Mead & Stuart Mead
- The late Jim Kinnett - my father in law. Without who's tools I couldn't have done this project. Every time I've needed a tool, I've been able to find it in the tools Robin & I inherited from him. He was also an inspiration to me...Stories of his CJV-35/U (post WW2 USMC jeep) & his jeep sitting in the warehouse reawakened my dream of owning a WW2 army jeep.
- Tommy Johnson - for finding my first WW2 jeep which became the parts jeep & blueprint for this restoration. Without that jeep, I wouldn't have a baseline to restore this jeep against....and some day that jeep will donate it's engine, transmission, and transfer case to the project...to replace the CJ-2a engine in the jeep!
| history | tub prep work | tub accessories | removing the tub | prep frame | building the tub | install new tub | jeep's birthday | in action | vendors | Thanks!